
Jen Carver, of Banner Events, here to share how to build a backdrop tutorial! SO Many of our dessert tables have backdrops that help create a focal point for your table.
After “How do you plan a party?”, the next most frequently asked question I get is, “How did you make your party backdrop?” Today, I’m going to let you in on a little secret. Anyone can do it! (But shhh! Don’t tell my husband. He likes everyone to believe that only he can build such party-transforming masterpieces.) What’s even better than it’s easy assembly? This backdrop stand is fully collapsible, size-adjustable, transportable AND inexpensive! Oh, and best of all? Using very simple and inexpensive materials you will effortlessly transform your lackluster party into something fabulous!

Now let’s get started on building your backdrop.
STEP 1: Head to your favorite home improvement store. We chose Home Depot. Pick up the following materials (approx. $20+/-):
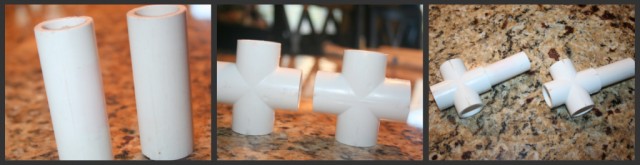
- 3/4″x10′ Sch. 40 PVC Pipe – 4 (at least)
- 3/4″ Sch. 40 PVC Elbow – 2
- 3/4″ Sch. 40 PVC T-Connector – 2
- 3/4″ Sch. 40 PVC Cap – 8
- 3/4″ Sch. 40 PVC Cross Connector – 2
Additional tools needed:
Either a PVC pipe cutter, mitre saw or hacksaw (Note: most home improvement stores will also cut your pipe to size for free.)
(STEP 2: Using a PVC pipe cutter, mitre saw or hacksaw, take your 3/4″ x 10′ PVC pipe and cut 8- 1 foot pieces. Place a cap on one end of each.

STEP 3: Next, take your remaining 3/4″ pipe and cut 2 pieces of pipe, approx. 2 inches in length, and firmly stick them into one hole on each of the cross connectors (they look like a + sign and have 4 holes for connecting purposes).
STEP 4: Stick the T-connectors on the 2″ pieces of pipe, and stick one of your 1 foot cut pipe sections into the other end of the T-connector (the top of the T will be for the vertical sides of the actual background frame).
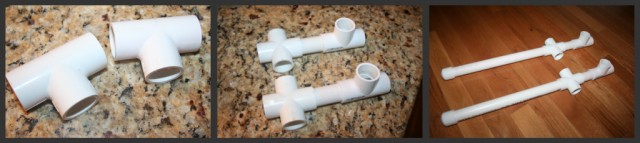
STEP 5: Stick your other 1 ft. pipe sections into the other open holes on the cross connectors, so you have two large “+’s,” with a T-connector on the same side of each. You should have 2 bases for your stand.
 Now that the base supports are finished, we will work on building the frame.
STEP 6: Cut two of the other unused sections of 3/4″ pipe pieces to whatever size you’d like (these will determine the height of your backdrop stand). Make sure the height is low enough to not hit the ceiling if you’ll be using the stand indoors, but high enough so the backdrop will provide an adequate background for your dessert or buffet table. (*I cut my pieces to 7 feet. You can always adjust the heighth of your backdrop by using shorter or taller pieces of pipe, based on your needs.)
STEP 7: Next you will be cutting your top ‘crossbar’. The length of your ‘crossbar’ (the top piece of PVC pipe) depends on how wide you want your backdrop to be. Since I wanted it to be as wide as the dessert table I most commonly use, I had my crossbar cut to 6 ft. *The crossbar can easily be traded out for a wider or narrower piece of PVC pipe should you need to adjust the width of your background.
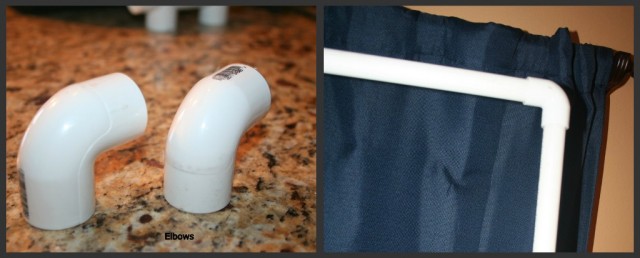
STEP 8: Now, take the two side support pipes you cut in STEP 6 and stick a 90° elbow on one end of each one, then stick the crossbar pipe into the two elbows.
STEP 9: Finally, you are ready to stick the two side support pipes into the tops of the T-connectors on each base, and see how your backdrop stand looks. You may need to slightly adjust and tighten each connection to secure your stand.
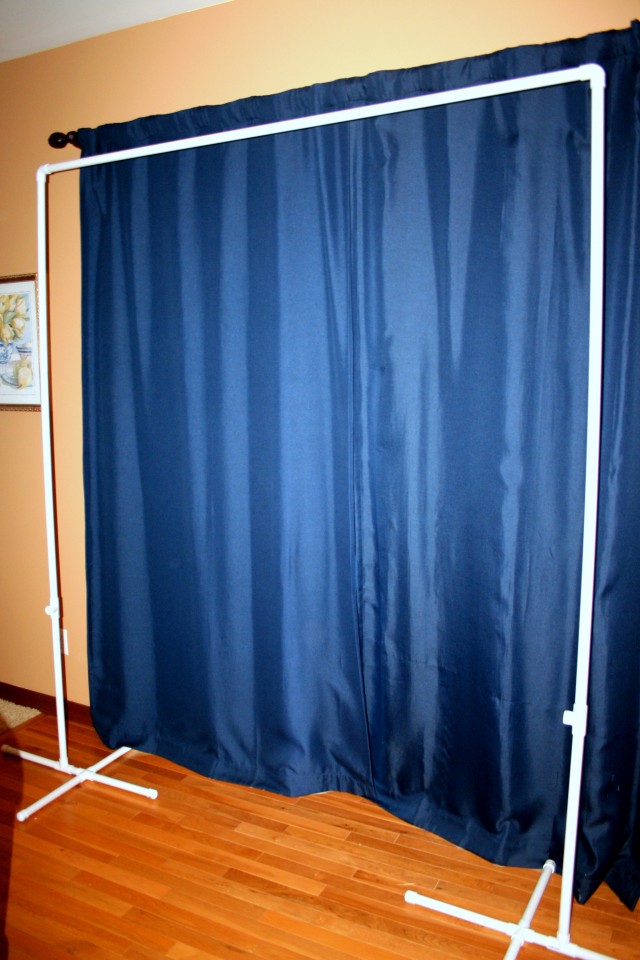
Adding Fabric/Material to Your Background Stand:
The great thing about this background stand is that a variety of materials can be used for the background. Add a tablecloth, sheet, fabric, butcher paper, wrapping paper, etc…
In the featured picture, I used a striped flannel backed vinyl tablecloth, purchased from Target for $5. Installation was easy!
1- I made sure the tablecloth was as wrinkle free as possible. (I steamed it.) *Be sure you follow instructions for the kind of fabric/material you are using to avoid burning it!
2- I centered the tablecloth on the top of the crossbar so that my overhang on each end was approximately equal, then rolled the top over the crossbar, ever-so-slightly and secured it with straight pins.
3- Then, one side at a time, I pulled the fabric taut on each side and finished by rolling it around the side supports and secured it with straight pins as well.
You are now ready to decorate your backdrop.
Many different party supplies can be added to your backdrop for added interest and pizzazz. Consider adding a printable banner and graphics from one of Anders Ruff’s printable packages to easily tie in your theme. Coordinating images on things like cupcakes & party favor bags help make the background an extension of your tablecloth & tabletop decor. Party poms, fans, parasols, balloons, bunting and streamers are all fun additions too.
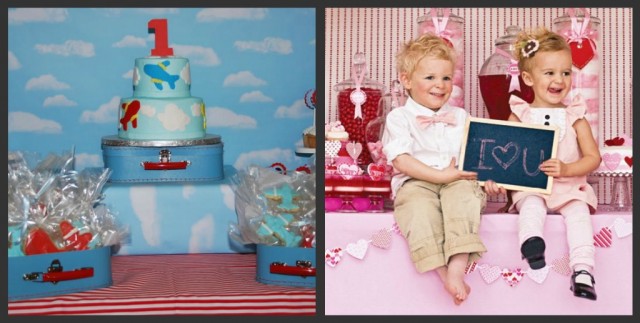
Here are a just a couple of examples of how your new backdrop stand can be used with patterned butcher paper (the clouds) or fabric. (For more pictures, see Brady’s Airplane Party and the I Heart Valentine’s Day collection.)


I’ve been looking for a better option on how to create the perfect backdrop, but I am just not handy enough to have figured out all of the measurements on my own. Thank you!
thank you so much…
I didn’t believe that it’s it!!!
I love parties… and do it myself… and this idea is all I really wanna know
brazilian hugs
thank you for sharing. This is now on my husband’s to-do list.
This is great! Thanks so much for the tips!
LOVE it … love the idea… and so easy .. I will make it for sure … kisses from Vancouver BC !!!
OH MY GOSH! the answer to my prayers! no longer will i have to crack my skull trying to think of how to create the perfect backdrop LOL (no joke)!! just in time for the 3 parties i’m helping plan..ALL AT THE END OF THIS MONTH! forget the hubby..i’m just as handy! haha.. thanks so much for the awesome tips<3
hugs and kisses from so. cal xoxo
2 words:
I
LOVE
YOU
Wait that’s 3 but who cares??? Thanks for sharing! Gotta get my hubby to do it for me 🙂
I really could have used this for my daughter’s party but you live and learn and I thank you guys for putting this up because I will figure this out for future events.
hope I could do something like this. rgds, dalys
Thanks for the tutorial, this is very helpful.
I also would like to know, where can I purchase Patterned butcher paper? Thank you
Michaels sells several large rolls of various patterns of butcher paper. Hope that helps!
And this is why I love you guys!!! I tell everyone about your printable. I’ll only shop your site. Thanks!!!
Thank you so much…I had it on my mind but was thinking using a empty can with cement or clay to secure it…Your tip will help me a lot now…Thank u so much for sharing it :)Big hugs from Brazil too
Thank you, thank you, thank you. I have been racking my brain as to how I am going to set up backdrops for my daughter’s birthday party coming up with out having to rely on my very busy husband. Plus it’s always nice to be able to do this stuff on my own. Makes me feel very capable and independent! lol
Thank you for this! I too have been racking my brain to get such large backdrops,
Fabric question — since it’s sold in smaller widths, do you just buy & patch them together side-by-side? Pulling tightly so the seams aren’t obvious?
Also, do u have a great smaller steamer? Haven’t used one since my traveling with suits days!
Those are great questions! I try to find fabric that is already the size I need. Since the stand is adjustable, sometimes I have made it a little smaller than my dessert table to accomodate the width of the fabric. Many times, I’ve bought upholstery fabric, etc…. that comes in the wider widths. However, what you suggested would work as well!
As far as the steamer goes, I recently purchased a new iron that converts into a steamer. It works great! Good luck!
LOVE it! I am planning the AndersRuff Lego themed party for my twins….and believe me…their Daddy will be building 2 for me!
Thanks for the tutorial! I actually ran to home depot last week to get the peices cut & assembled it all in under 10 min. Awesome! I just have one question: Mine tends to not stay upright without being tied to the table, one side tends to lean backwards – is that normal? It is 7ft high and 6 feet wide per your recommendation. Thanks so much <3.
Hi Dina~ I have only run into that problem if I don’t have all of the connections tight and lined up correctly. If you are using your backdrop against a wall, sometimes I have taken off one of the support legs and actually just put the stand right up to the wall with the table pushed against it. If you are using the stand outside w/o a wall behind it, sometimes putting weights (even rocks) to help keep it from swaying w/ the wind work.
Love this, and will be featuring this tutorial on my blog tomorrow. I have been simply using command strips on walls, but I love the flexibility of this stand. Thanks for all the great ideas, thanks for sharing!
Hi! I have a question-
Why do you have the joints about 2 feet up the sides from the floor? Is that for stability?
Thank you so much for this idea!I made the frame, it works very well, but it needs some support. Is it only me?
OMG!!!! I totally LOVE it! Thank you so much for this, you are a party saver :-). Heading to Home Depot tomorrow.
Curious to know how much the supplies added up to? I though I read somewhere how much you spent a while back but now I can’t find it.
Thanks…
BTW>…. I LOVE the idea!!
Hi Erika~ I’m so happy you love the idea too! The supplies added up to approximately $20. Hope this helps!
hi! thanks for this wonderful tutorial! do u know if vinyl backdrops with pole pockets will be ok with this stand? or eill the vinyl be too heavy?
Thank you for this wonderful step by step tutorial on making backdrops. It’s great. I needed it.
I am planning on making this for use at several parties I have coming up. Any idea how much weight I would be able to hang for the cross bar? It would be for hanging tea cups. Thanks!
Hi- I have generally only used fairly light weight items from my stand, but have successfully hung a picture frame and other light objects using fishing line. I would suggest if you are going to do something fragile like tea cups, you may want to cement in part of your PVC pipe to some #10 cans. You can use a connector piece for the PVC pipe allowing you to still easily disassemble and store your PVC stand when your event is over.
I figured cementing in would be the solution, just thought I’d ask to see if you’ve tried anything else. Since this will be behind floor length table cloths, I’m thinking tent weights or sand bags would help brace the bottom. Also, my engineer husband suggested putting a dowel rod through the crossbar to keep it from bowing in the center. I’ll let you know how it works so you can pass the tips along! Thanks, girlie!
What length and width would you recommend for the cloth that I will use for the backdrop?
Hi- the dimensions of your fabric will vary based on the size of the backdrop you need and the dimensions of your table or piece of furniture you are using. Some people like their backdrop to be as wide as their dessert table. Others use a slightly scaled down backdrop with wall showing on each side of their backdrop. It’s really personal preference. You will want to measure and allow extra fabric to wrap around the polls on each side and also allow extra fabric to hang just below your table top.
Hello I am needing some help with making a pvc pipe backdrop of about 12 feet long for my wedding. I am going to be stringing lights and tool on it. Could you still use the size pvc that you used or would I need to get something larger?
Hi Jamie- As far as I know, PVC pipe only comes in 10 ft” lengths. Since you are needing something 12″, you would have to have the PVC pipe cut and connect it with a connector piece to get the length needed. My concern with that is that 12 ft is a very long lenth for PVC and you would get bowing in the middle. I’m not sure it would be sturdy enough. You could try adding a second cross bar at the bottom for support and cementing in your vertical PVC pipes in cans for added weight/support. I would also glue all of your joints if you plan to have a PVC structure that large.
Just did this for a baby shower! No longer do I have to rent pipe and drape. THANK YOU!
Hi! Love the detailed instructions! They are perfect! One question though, why do you have the joints about 2 feet up the sides from the floor? Is that for stability? Are they used to tie up the stand against a table?
Hi- Just ignore those. 🙂 Originally, I was going to have another cross bar for support, but didn’t need it.
Hi,
Thank you, you don’t know how long I have been searching to do something like this! 🙂
Cheap,easy and totally amazing!!! This is exactly the info I have been searching for 🙂 Thank you so much for sharing your DIY tips.
This is a wonderful tutorial! Thanks for your creativity!
Hi thanks for the tutorial! I purchased everything and when i set it up it is all wobbly. Is there anything i can do to make it sturdy?
Hi Jessica-
I have a couple of suggestions for you to try. First, make sure all of the connections are really tight, especially where vertical and horizontal pieces meet together. The tighter you can make those connections, the more secure your stand will be. If you are still having problems, you can always take super glue and actually secure your pieces or at least some of the pieces. This will make it so your stand isn’t fully collapsible, however. Some people like to cement their vertical side pvc pipes into tin cans to keep them weighted down. That is another option.
I love this and am in the process of making a stand…yay!!!
My problem is I’m struggling to figure out how to secure the fabric without the poles on either side being exposed.
I’m terrible at sewing so a video tutorial would be appreciated!
Toodles
Hi- I actually don’t sew any of my fabric backdrops. I lay my fabric on the ground and use pins to secure the fabric around the top pole of the stand first, and then stand it up and pull it taut and pin each side (the pins don’t even show) from the back.
I’ve built the backdrop stand, however, I’m abit concerned as the bottom poles are protruding from the sides of the table.
Please help with the best way to hide the poles!!!
Thank you
Ferhana
Hi- If you are referring to the poles that provide support on the ground, sometimes I just pull off the ones that stick out and push my table up against the poles and the wall. If you aren’t using a wall behind your backdrop, you can always shorten the length of your cross bar so that it is slightly smaller than your table, and therefore hide the poles from showing on the ground.
Ahhhh sooo excited to have found this blog post!! I will be adding a blog to my website, that will demonstrate party themes & ideas to match our edible cake toppers.
This is just what I need!!!
Thank you!!!!
🙂
I’m so glad I found this! I’ve been wondering how these backdrops are created. 2 quick questions: I saw in some of your parties that you hang pictures using ribbon on the backdrop (like at the Snow White party). Any tips for doing this? It seems like the backdrop wouldn’t be stable/strong enough for that. Also, the legs and stand of the backdrop look virtually undetectable once it’s up. How did you do that? Thanks in advance!
Love this this is what I was looking for my son is getting engageI am going to use this for my son engagement party going to be behind their table Thank you a lot a lot a lot of hugs and kisses
Hi THANK YOU for sharing your Frame idea! I actually used it this weekend to create a Frozen themed balloon arch for my niece’s 2nd birthday.
It was perfect, wish I could share it with you. Thanks again
Hello thank you for the pictures and for explaining with great detail. I do have a question and hopefully you can help me figure out the answer. I bought some fabric for the pvc pipe backdrop i wanted to make. The fabric across is around 60in Width about 5ft, and is 8ft long or tall. The table i want to use is 6ft long. My question is i read in one of your post below, that make sure you have enough fabric to wrap around the pipes to cover them using straight pins. What measurements do you recommend i should use to have enough fabric to wrap around. What do you use ? Thanks! so much! I hope i made sense.
Hi! I definitely think you have enough fabric. Just make sure that when you build your backdrop frame you make it a bit shorter in length and height than that or your fabric. Feel free to email me at heidi@andersruff.com if you need additional assistance!
Thannnnksss a lot! Bless yo!
We are planning a women’s retreat. For the past couple of monts, trying to figure out how to build backdrops (we will have 4 stations) has been a pain in the rear. We consideres wood frames, room dividers, etc. but they are either costly or heavy!
This morning the image of pipes crossed my mind. I immediately open pinterest. My search was directed to your page! Violá!!!! Our proyect will be done in no time and saving tons of money! Thank you for such an amazing tutorial. Fresh and easy 🙂
How much fabric do you use to cover the backdrop?
I just made this today with my dad’s help and it turned out amazing!! Thank you so much for sharing this!
I absolutely love this, thank you so much for sharing! I only have one question can this be taken apart afterwards ?
So glad I found this! Every year I struggle with the wind blowing my backdrops over. Who knew there was such an easy solution!